

By Ethan Maurice | September 8, 2015
If you're interested in backpacking the John Muir Trail (JMT), here's some valuable knowledge and a few tips from my experience.
Reserving A Permit
Lots of people want to backpack the JMT. In fact, the number of permit applications Yosemite National Park receives has doubled in the last four years. If you want a chance at securing a permit from Happy Isles (the official starting point of the JMT) you have to now apply exactly 182 days (26 weeks) in advance of your start date. Twenty people will be awarded this permit each day, while hundreds of people apply. It took us eight days of faxing in an updated permit application to finally get in. It's even more difficult to secure a permit now, but with a little luck it can be done.
Here's a link to the application and further details.
*Note: You can go the opposite direction (from the base of Mt. Whitney to Yosemite), but after experiencing the trail myself I'd save that 14,505ft high mountain for last.
Gear
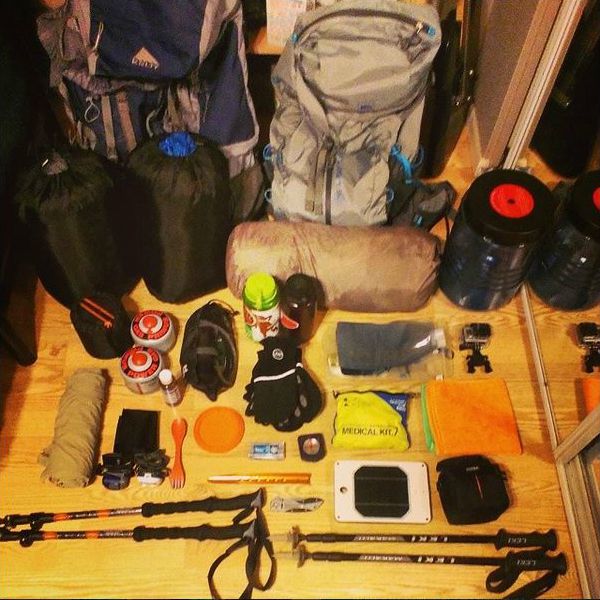
Finding the right balance between the amount of creature comforts you bring and the lightness of your pack is important. Most people tend to over pack, so ask yourself, “Is this worth carrying 221 miles on my back?” with each item. Fully loaded with food, water, and all my gear, my backpack weighed 52lbs at the trailhead. It wasn't unmanageable, but hopefully yours will weigh less.
Two more gear suggestions: bring a good rain jacket (with a hood) and mosquito protection. It rained quite often on us and with our light, un-hooded rain jackets we got awfully cold (and wet) at high elevations. Mosquitoes are hit or miss out there. One day we encountered this massive cloud of them. Without a mosquito head net and bug spray, I would have been bitten hundreds of times in a matter of a couple minutes. Fortunately the rest of the trail was relatively mosquito free.
Most people hike the JMT in boots. I hate boots. I wore trail running shoes and loved every second of them. My sister wore boots. She took twenty minutes to put her boots on every morning because she had to cover all the blisters on her feet with moleskin. You're less likely to roll your ankle with boots on, but damn can they make the experience so much more painful. Choose wisely.
Lastly, bring hiking poles. I'd always thought they were overkill and unnecessary, but I was wrong. Hiking poles make going uphill much easier. Hiking poles make going downhill much easier. I also would have tripped a dozen times out there, but I caught myself with my poles every time. Get em'.
Here's a complete list of everything you could bring backpacking. Don't bring each item on this list, but consider it.
Training
You're going to be carrying all your gear repeatedly over mountain passes ranging from 10,000ft to well over 13,000ft in elevation. There's not a lot of oxygen up there as you're switchbacking your way up to such incredible heights. Do a couple backpacking trips with all your gear before you embark on the JMT to help you figure out what you need and more importantly, what you don't need. Do a lot of hiking and jogging before you go too. The better shape you're in, the more fun you'll have.
Food

The usually simple act of figuring out what to eat is complicated by the JMT. There are a couple resupply points along the way you can ship your food to, but they are few and far between. We shipped resupply packages to Reds Meadow Resort (59 miles in) and Muir Trail Ranch (107 miles in). This leaves more than 100 miles without a resupply at the end of your trip though, so consider hiking out to Onion Valley (178 miles in) and hitching down to Independence if you're taking your time on the trail.
Figuring out what kind of food to bring and how much is also a bit complex. Basically, you want as many calories as you can fit into your required bear canister. We packed roughly 5,600 calories a day to split between the two of us (3,000ish for me, 2,600ish for my sister). Figuring out how many calories, from what kind of food, and dividing up where to ship them requires some math, so I made this excel spreadsheet to help calculate everything:

This spreadsheet was for our last resupply bucket to Muir Trail Ranch, supplying us with 10 days worth of food.
It should also be noted, at Muir Trail Ranch there is literally hundreds of pounds of extra backpacking food left from people overpacking there resupply buckets. We made the mistake of trading out more high calorie foods like trail mix for delicious, but lower caloric density backpacking dinners. As a result, I got pretty hungry the last few days. Upon my return home, I stepped on the scale to find that I'd lost 20lbs over 20 days on the JMT. Be careful altering your food plan!
Getting There
If you're coming from out of state, flying into San Francisco or Oakland is going to be your best option. From either airport, you can take a succession of trains and buses that will take you to the heart of Yosemite National Park. This is how we did it, and it's by far your cheapest option, especially if you don't want to pay for a rental car while it sits in Yosemite for the duration of your entire trip.
Here's an article that explains the whole process.
Lastly, buy this book. It's the "bible" of the John Muir Trail and will help you with everything from planning your trip to navigating the entire trail.
Good luck! If you have any questions, feel free to contact me.


